
How to get started on Zeffy
For a visual walkthrough please see the tutorial below!
Welcome to Zeffy!
Zeffy is 100% free for nonprofits. All of our services and products are 100% free. We also cover 100% of credit card transaction fees. We've put together a series of instructions to get started on our platform.
1) Sign up for a new account
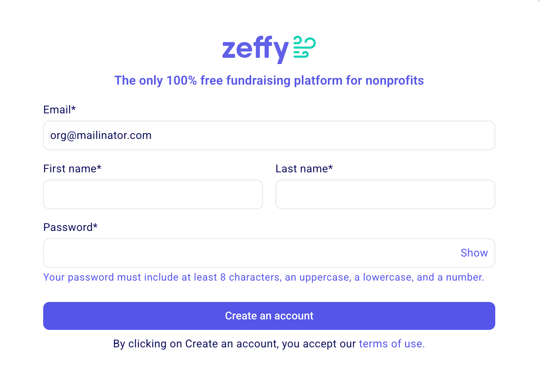
Create your account here.
The first thing you'll have to do is add your email, your name, the name of your organization your phone number, and your website.
Make sure to check whether you are a US, Canadian, UK, or Australian account❗You won't be able to change this later on.
Set your password and click on "create account"
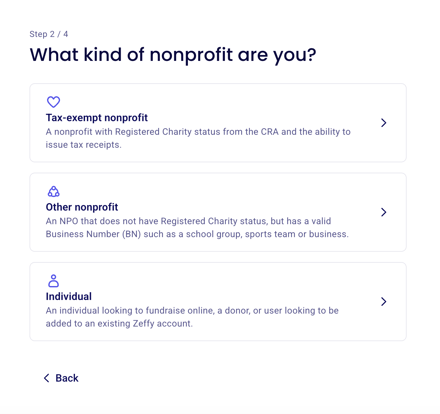
You will be asked what kind of organization you are. Please select which organization type is the right fit for you:
2) Create your first form
As a new account, the first thing you will be prompted to do is set up your first fundraising campaign. This is part of our onboarding flow so that you can familiarize yourself with the platform and its functioning. You can go back and edit this campaign at any time!
Search our knowledge base for tips on how to create your first campaign.
3) Add your administrative information
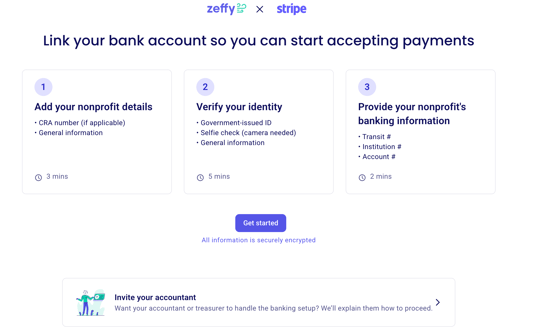
Once you have created your first campaign you will be taken to your dashboard. Go to the "Finances" tab in the left of your menu to add complete the onboarding steps, including linking your bank account. Click on "Get started" to begin onboarding!
This includes the type of your organization, the address of the organization, and much more. A few important tips:
🇨🇦 If you need to generate official tax receipts as a registered Canadian charity, make sure to upload your charity number and an electronic copy of the signature of somebody authorized to sign on behalf of your non-profit.
🇺🇸 If you need to generate official tax receipts as a registered American charity, make sure to select that you are a 501c organization and enter your EIN.
🇬🇧 If your organization is eligible to claim Gift Aid, you can enter your HMRC number and integrate your Zeffy account with Swiftaid to claim it.
🇦🇺 If your organization has DGR status endorses by the ATO, you can generate tax receipts through Zeffy by indicating that your organization is a registered charity. You will be prompted to enter your ABN.
You can read more about automatic tax receipts here!
Make sure to add a "description on your contacts bank statements" to make sure that your donors and buyers recognize their payments to your organization.

4) Complete the Stripe verification
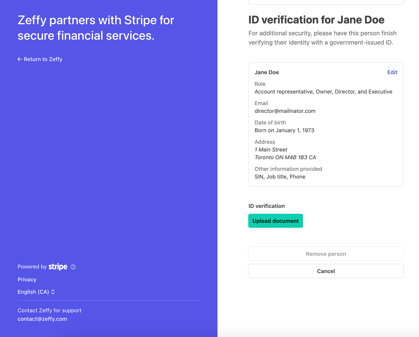
Zeffy is partnered with Stripe, a global leader in online transactions. By using our platform, you can connect your bank account with Zeffy through Stripe. This allows you to track your payments, manage deposit frequency, and analyze your data directly from your Zeffy account.
You will be guided through Stripe's verification steps. Here is the information you will be asked for:
The legal name of your organization. Please note that the name provided must exactly match the name associated with your government issued documents, or the name on your organization's bank account.
The legal address of your organization
The legal representative of the organization's information (name, date of birth, address, a photo of your driver's license or ID)
For more information on the bank account verification process and common things to be aware of, we invite you to take a look at our instructions here:
(US) Failed EIN Verification: if your EIN verification fails, we invite you to consult our documentation here with tips on how to troubleshoot verification failures. Why does my EIN verification keep failing?
➡️ Failed ID Verification: if your ID verification fails, you can consult our documentation here. Why is my ID not being accepted?
(CA) Failed business verification or directorship verification: If you're having trouble verifying your business registration or directorship structure, please consult our documentation here.
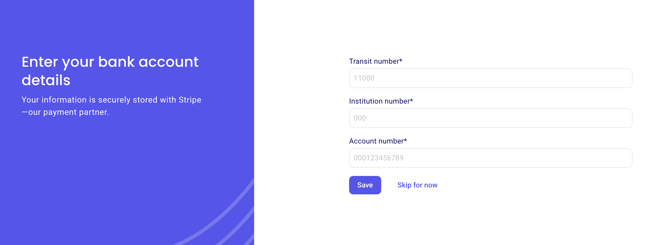
5) Connect your bank account
Have a void cheque on hand. The final step to enable payments and payouts to your Zeffy account will be to connect your organization's bank account. Funds raised through Zeffy will be deposited directly to your connected bank account according to your payout schedule.
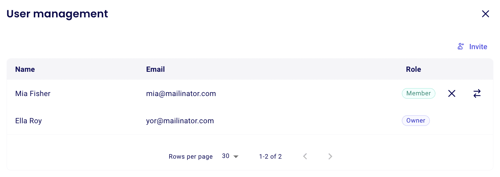
6) Add your team
Click on your name in the bottom left hand corner of your screen, and open settings. Next, click on "User Management", and click on "Add user". You can add up to 50 users, and restrict permission across different sections of the product! For more information, consult our documentation here.
7) Make changes
If you need to go back and make edits to the information entered during the onboarding flow, click on your name in the bottom left of your dashboard, then click on "Settings". You can edit your donor-facing information such as your doing business as name and your organization's public address in the "Organization Information" section. If you need to change any legal information submitted during the verification, click "Bank identity."
Congratulations on setting up your Zeffy account! You can take a look at the following pages if you need help setting up your first Zeffy campaign:
7) Advanced Tips
Creating a second account – do you work with multiple nonprofits but want to use the same email for your Zeffy login or account? You can create multiple accounts with the same email. To do this, you can:
Log in on a computer to your Zeffy dashboard.
Click on your name in the bottom left hand corner of your screen, and open "Settings."
Click "Create a new organization" in the menu.
Enter the information for your new organization!